


Gap Assessment
The Gap Assessment dashboard identifies which PCI DSS requirements have findings gaps — requirements that are not in place, not tested, or not yet evaluated.Accessing Gap Assessment
Open Your Assessment
Navigate to the assessment from the Engagement Hub or the Assessment Workbench.
Dashboard Overview
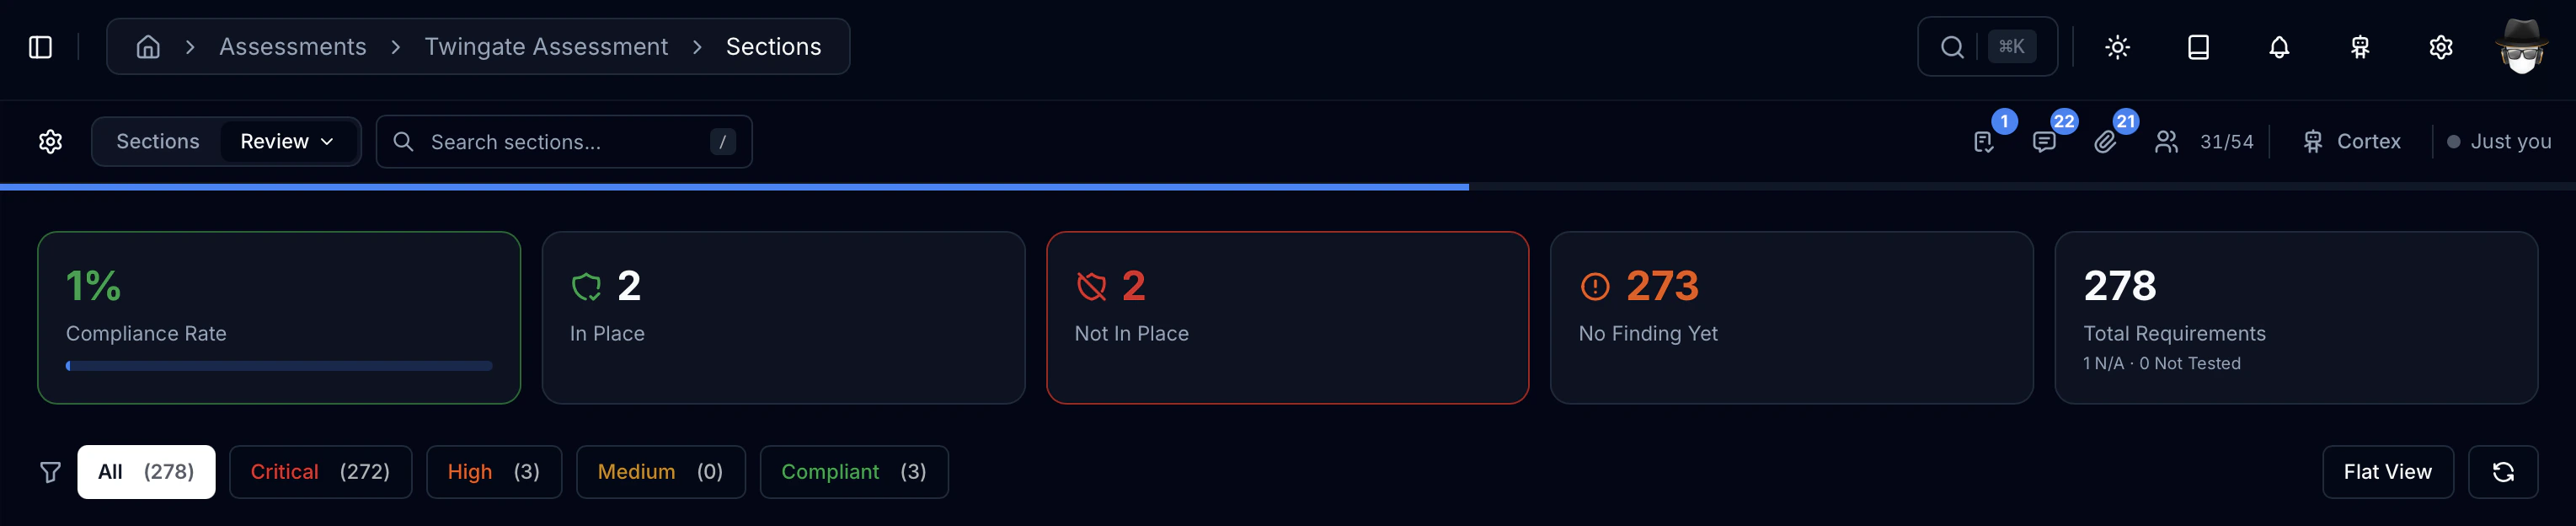
The top of the dashboard displays five summary cards:| Card | What It Shows |
|---|---|
| Compliance Rate | Percentage of requirements that are In Place or Not Applicable, displayed with a progress bar |
| In Place | Count of requirements marked as fully compliant |
| Not In Place | Count of requirements marked as non-compliant (highlighted in red) |
| No Finding | Count of requirements with no finding status recorded (highlighted in amber) |
| Total | Total requirement count with sub-counts for Not Tested and Not Applicable |
Gap Severity Levels
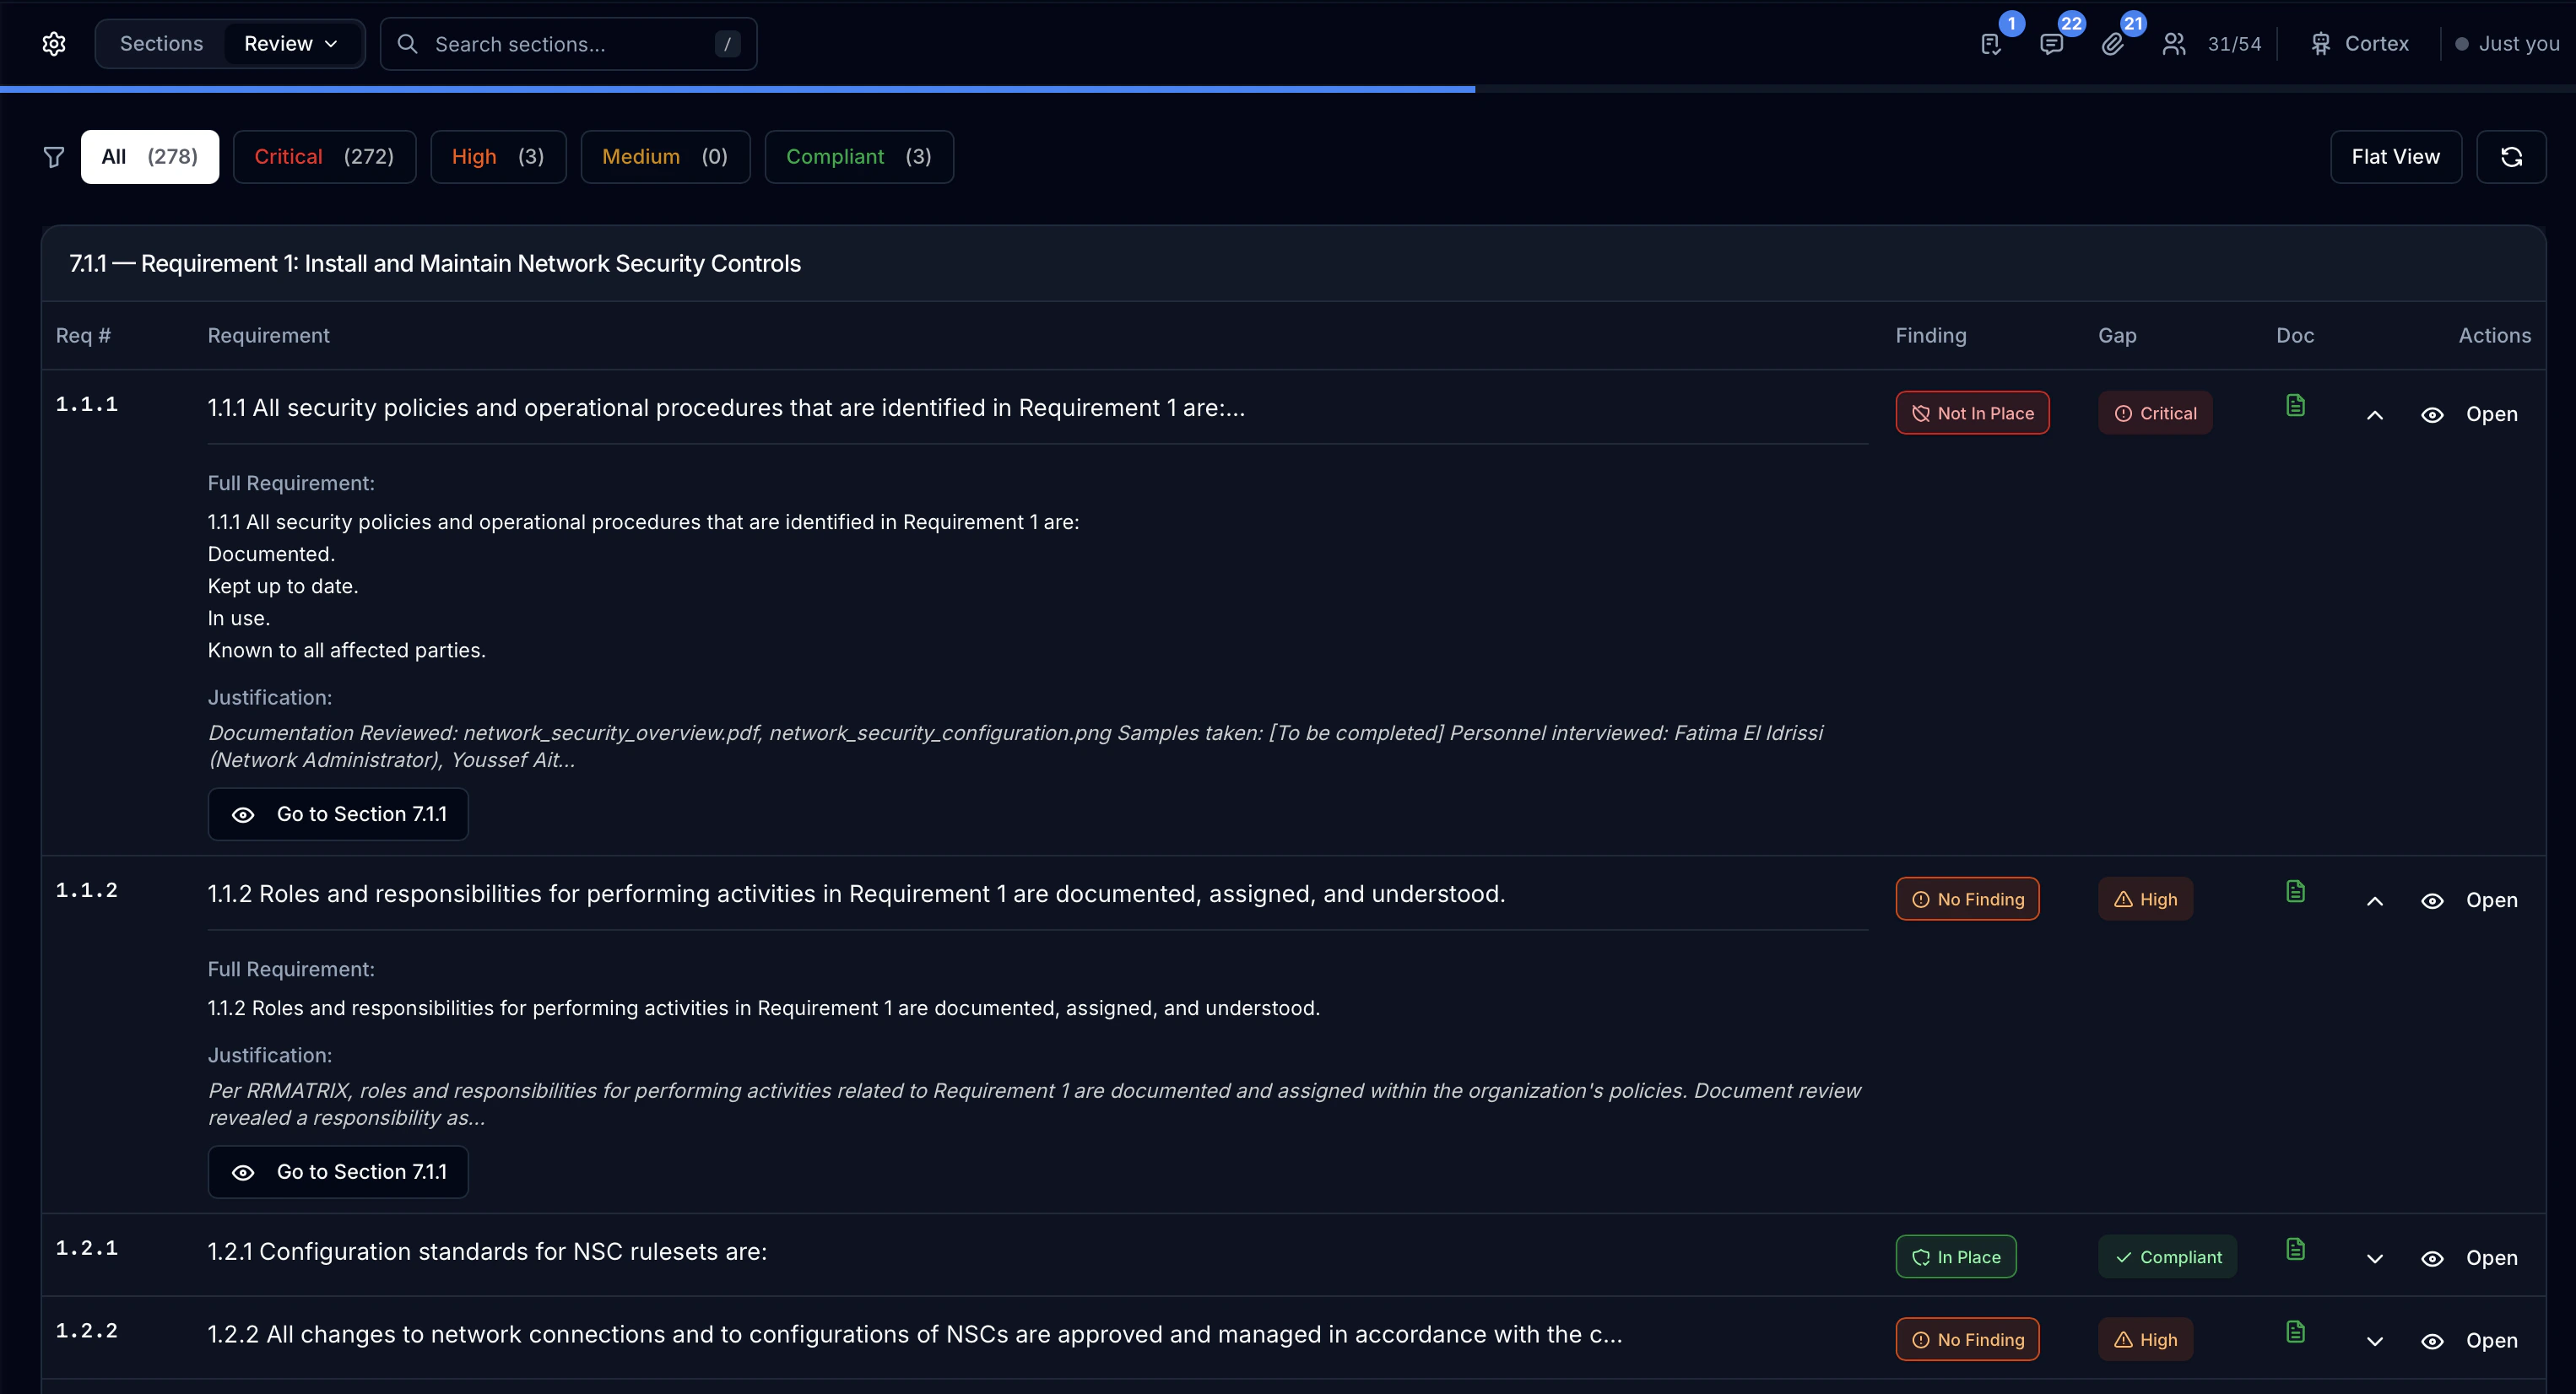
Each requirement is assigned a gap severity based on its finding status:| Severity | Condition | Action Required |
|---|---|---|
| Critical (red) | Not In Place, or no finding recorded with no justification | Immediate attention — requirement is non-compliant or completely unevaluated |
| High (orange) | Has justification but no finding status selected | Assessor has documented observations but not made a determination |
| Medium (yellow) | Marked as Not Tested | Control exists but was not evaluated during this assessment |
| Low (blue) | Minor documentation gaps | Minimal risk, typically administrative |
| Compliant (green) | In Place or Not Applicable | No gap — requirement is satisfied |
Filtering and Navigation
Filter the requirement list by severity using the filter buttons:- All — show all requirements
- Critical — show only critical gaps
- High — show only high-severity gaps
- Medium — show medium-severity gaps
- Compliant — show only compliant requirements
Requirement Detail
Expand any requirement row to see:- Full requirement text from PCI DSS v4.0.1
- Justification preview — the first 200 characters of the assessor’s written justification (if any)
- Method badges — Compensating Control (CC) or Customized Approach indicators
- Missing justification alert — a warning when a non-compliant requirement has no supporting documentation
- Go to Section button — click to navigate directly to that requirement in the workbench
Refreshing Data
Click the Refresh button to recalculate the gap assessment from the latest assessment answers. The dashboard always computes in real-time — no cached data is used.Risk Scoring
The Risk Scoring dashboard assigns a quantitative risk score (0–100) to every requirement in the assessment, considering multiple factors beyond just the finding status.Accessing Risk Scoring
Open Your Assessment
Navigate to the assessment from the Engagement Hub or the Assessment Workbench.
Overall Risk Score
The dashboard header displays the Overall Risk Score — a weighted average of all requirement risk scores, presented as a 0–100 score with a risk level badge.| Risk Level | Score Range | Color |
|---|---|---|
| Critical | 80–100 | Red |
| High | 60–79 | Orange |
| Medium | 40–59 | Yellow |
| Low | 20–39 | Blue |
| None | 0–19 | Green |

How Risk Scores Are Calculated
Each requirement’s risk score is computed from four weighted factors:| Factor | Weight | What It Measures |
|---|---|---|
| Finding Risk | 45% | The assessment finding status (Not In Place = 100, Not Tested = 50, In Place = 0) |
| Documentation Risk | 25% | Whether the assessor has written a justification (missing justification on a failing requirement = 100) |
| Completeness Risk | 15% | Whether testing procedure data has been filled in |
| Staleness Risk | 15% | How recently the requirement was last updated (>90 days = 60, >60 days = 40, >30 days = 20) |
- Requirements with a Compensating Control receive a 10-point reduction
- Requirements marked Not Applicable receive a 0 across all factors
Summary Cards
Four metric cards appear below the overall score:| Card | What It Shows |
|---|---|
| Critical Risk | Count of requirements with risk score 80+ |
| High Risk | Count of requirements with risk score 60–79 |
| No Risk | Count of requirements with risk score below 20 |
| Total Requirements | Total count of assessed requirements |
Finding Distribution
A visual breakdown of all requirements by their finding status:| Finding | Color |
|---|---|
| In Place | Green |
| Not In Place | Red |
| Not Tested | Yellow |
| Not Applicable | Gray |
| No Finding | Orange |
Requirement Risk Detail
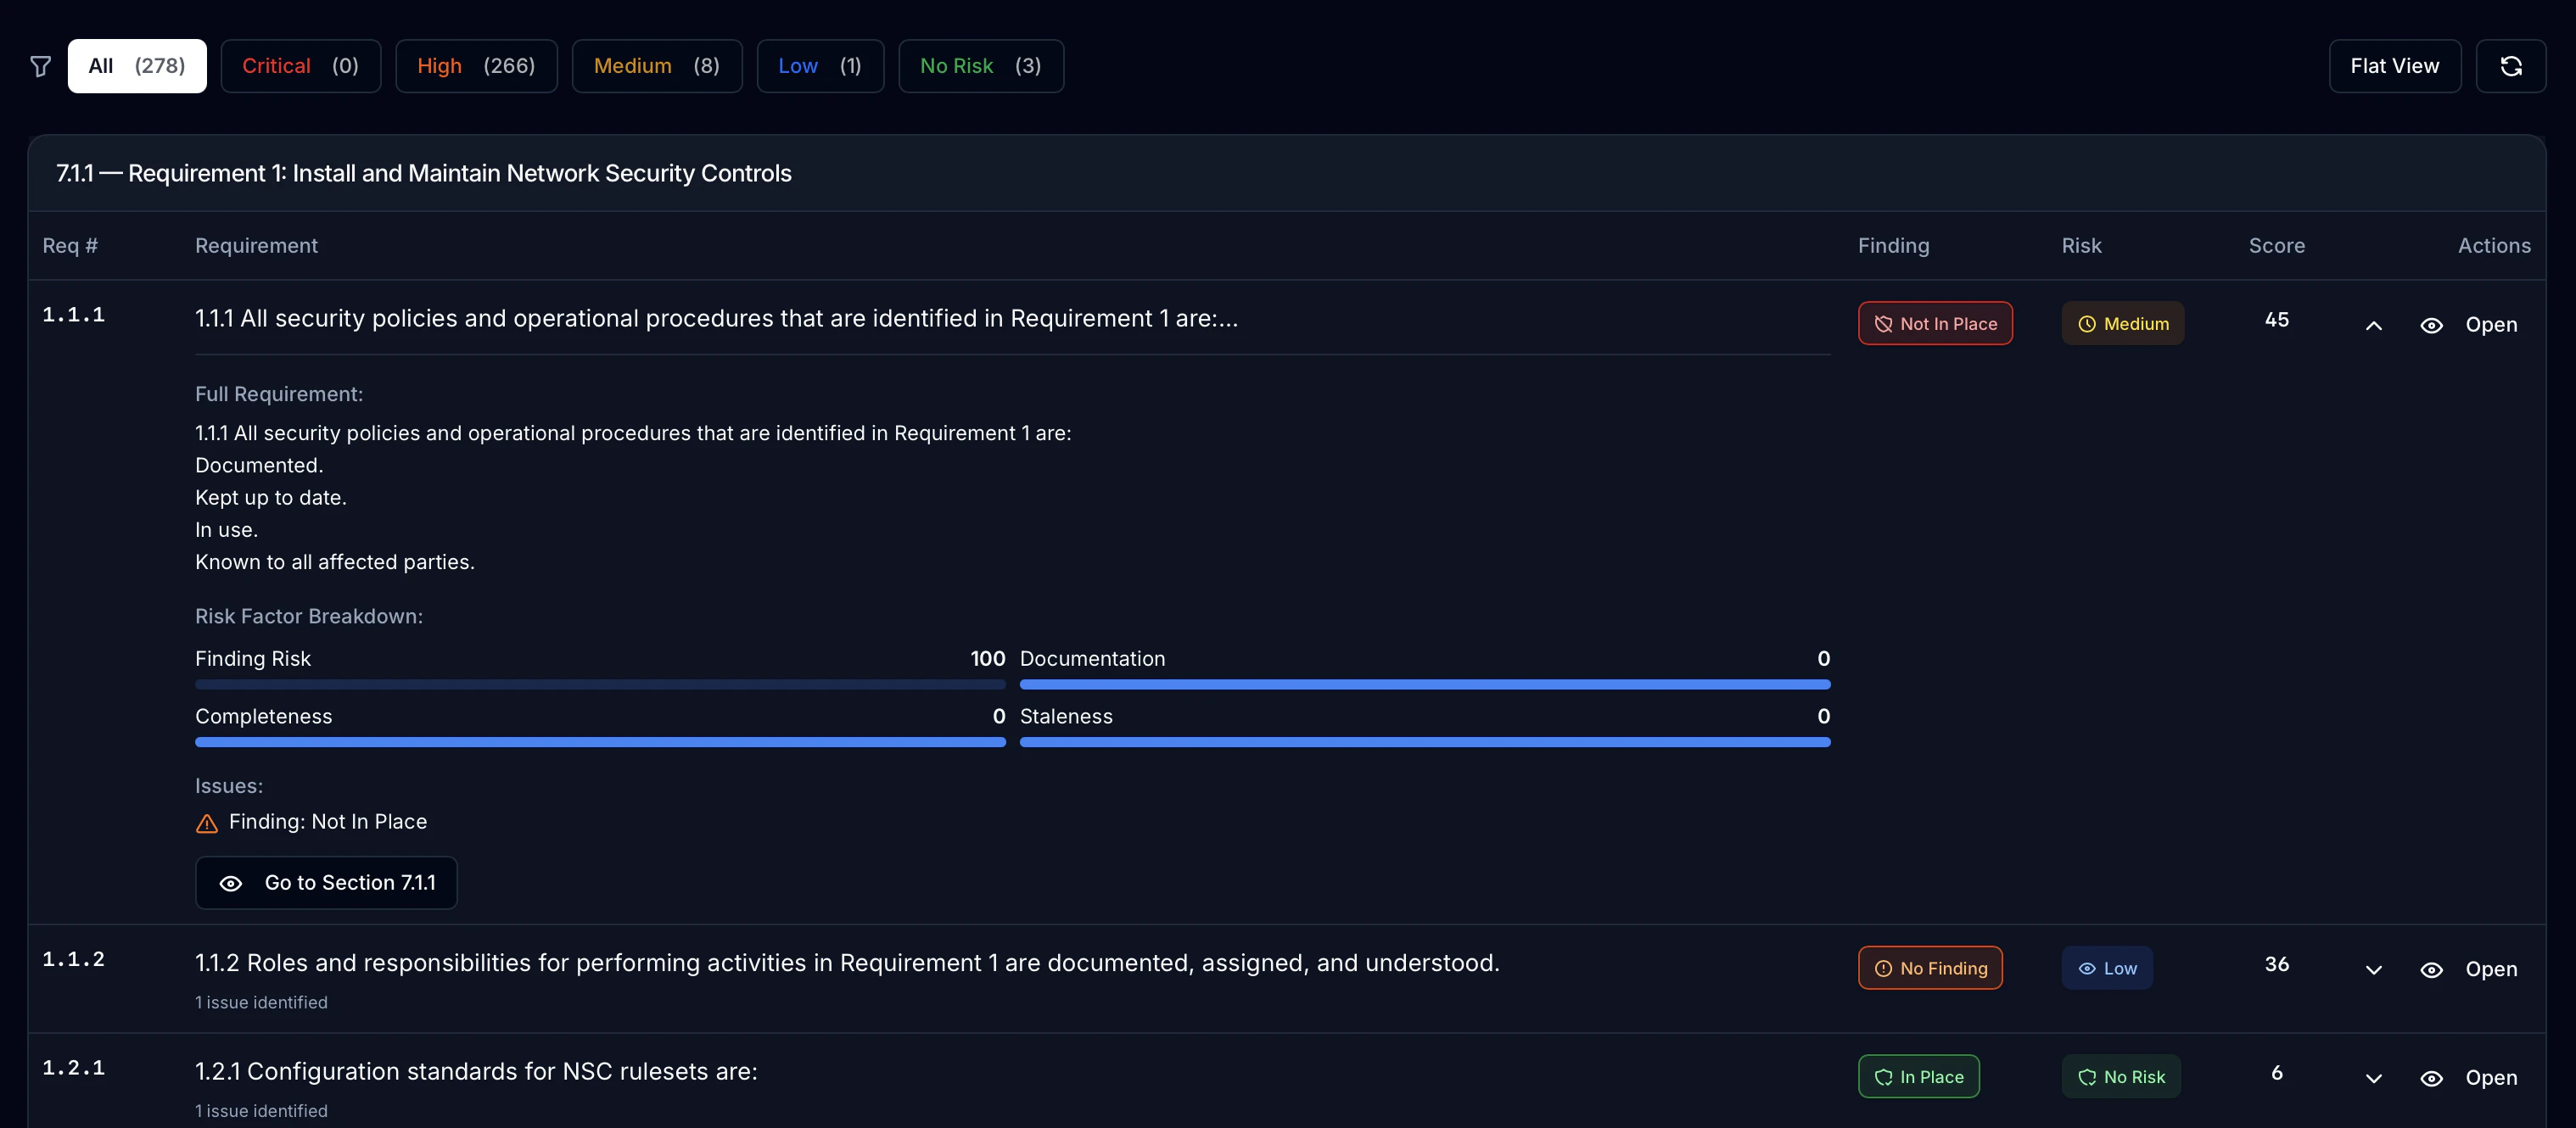
Expand any requirement row to see a detailed breakdown:-
Risk Factor Bars — four horizontal progress bars showing each factor’s individual contribution:
- Finding Risk (0–100)
- Documentation Risk (0–100)
- Completeness Risk (0–100)
- Staleness Risk (0–100)
-
Identified Issues — a bulleted list of specific problems:
- “Finding: Not In Place”
- “No assessment finding recorded”
- “Not yet tested”
- “Missing justification/evidence”
- “Testing procedures incomplete”
- “Data is stale (60+ days)”
- Go to Section button — navigate to the requirement in the workbench to address the issues
Filtering
Filter the requirements list by risk level using the filter buttons: All, Critical, High, Medium, Low, No Risk.AI Remediation Recommendations
The Recommendations panel provides AI-generated suggestions for improving your assessment, identifying weak areas, and strengthening compliance documentation.Accessing Recommendations
Automatic Recommendations
The platform generates rule-based recommendations based on patterns detected in your assessment data:| Type | Icon | Example |
|---|---|---|
| Warning | Orange alert | ”3 field(s) in this section are empty” |
| Suggestion | Blue lightbulb | ”Once complete, request review from QA team” |
| Tip | Purple sparkle | ”Ensure all evidence of security controls is documented with screenshots and configuration excerpts” |
| Improvement | Green target | Specific text improvements for brief or vague answers |
- Title — brief summary of the recommendation
- Description — detailed explanation and suggested action
- Reasoning — why this recommendation was generated (shown in italics)
- Confidence — how confident the system is in the recommendation (e.g., “90% confidence”)
- Action Button — one-click action to navigate to the relevant section or apply suggested text

AI-Powered Suggestions
For more targeted guidance, use the prompt field at the top of the panel:Enter a Prompt
Type a question or request in the text area. Examples:
- “How can I improve my security controls documentation?”
- “What evidence should I collect for Requirement 3.4.1?”
- “Suggest interview questions for encryption key management”
Submit
Click Send. Cortex generates context-aware recommendations based on:
- The current requirement you are viewing
- Your existing assessment answers
- The PCI DSS v4.0.1 framework guidance
- Your assessor role
Text Improvement Suggestions
For individual answer fields, the AI can analyze your written text and suggest improvements:- Passive voice detection — suggests active voice rewrites for clearer findings
- Date specificity — suggests adding implementation dates in YYYY-MM-DD format
- Evidence references — suggests adding references to uploaded evidence files
Workflow: Using Analysis Tools Together
The three analysis tools are designed to be used in sequence during assessment review:Identify Gaps
Start with the Gap Assessment dashboard. Filter to Critical and High severity gaps to see which requirements need immediate attention. Note requirements with no finding recorded or missing justifications.
Assess Risk
Switch to the Risk Scoring dashboard. Sort by risk score descending to prioritize the highest-risk requirements. Review the risk factor breakdown to understand whether the issue is a missing finding, missing documentation, incomplete testing, or stale data.
Get Recommendations
Open the AI Assistant tab. Review automatic recommendations for quick wins. Use the prompt field to ask for specific guidance on the highest-risk requirements identified in the previous step.
Address Findings
Use the Go to Section buttons to navigate directly to each requirement in the workbench. Update testing procedures, upload evidence, set finding statuses, and write justifications.
Linking Jira Issues to Requirements
For remediation tracking across engineering teams, Kliper integrates with Atlassian Jira. Assessors can link Jira issues directly to specific PCI DSS requirements so remediation work stays visible alongside the assessment.Connecting Jira
Authorize
From the Integrations page, click Connect Atlassian. OAuth authorizes Kliper to read and write Jira issues across the projects you select.
Linking Issues
Link an existing issue
Link an existing issue
From a requirement in the workbench, open the Jira panel and click Link existing issue. Search by JQL (e.g.,
project = REM AND status != Done) or by issue key. Select one or more issues to link. The linked issues stay visible on that requirement and update live as their status changes in Jira.Create a new issue
Create a new issue
Click Create Jira issue on the requirement. A form appears with the summary, description, assignee, and priority pre-populated from the requirement’s context (requirement number, current finding status, gap severity). Submit to create the issue in Jira and link it to the requirement in one step.
CSV import
CSV import
If your organization tracks remediation in a spreadsheet instead of Jira, Kliper supports CSV import of issue references. Upload a CSV with columns for issue key, summary, status, and linked requirement, and Kliper creates the links without needing OAuth.
The Jira integration panel shows either the OAuth flow or the CSV import section, never both at once, so the UI reflects which path the assessor is using.