

Uploading Evidence Files
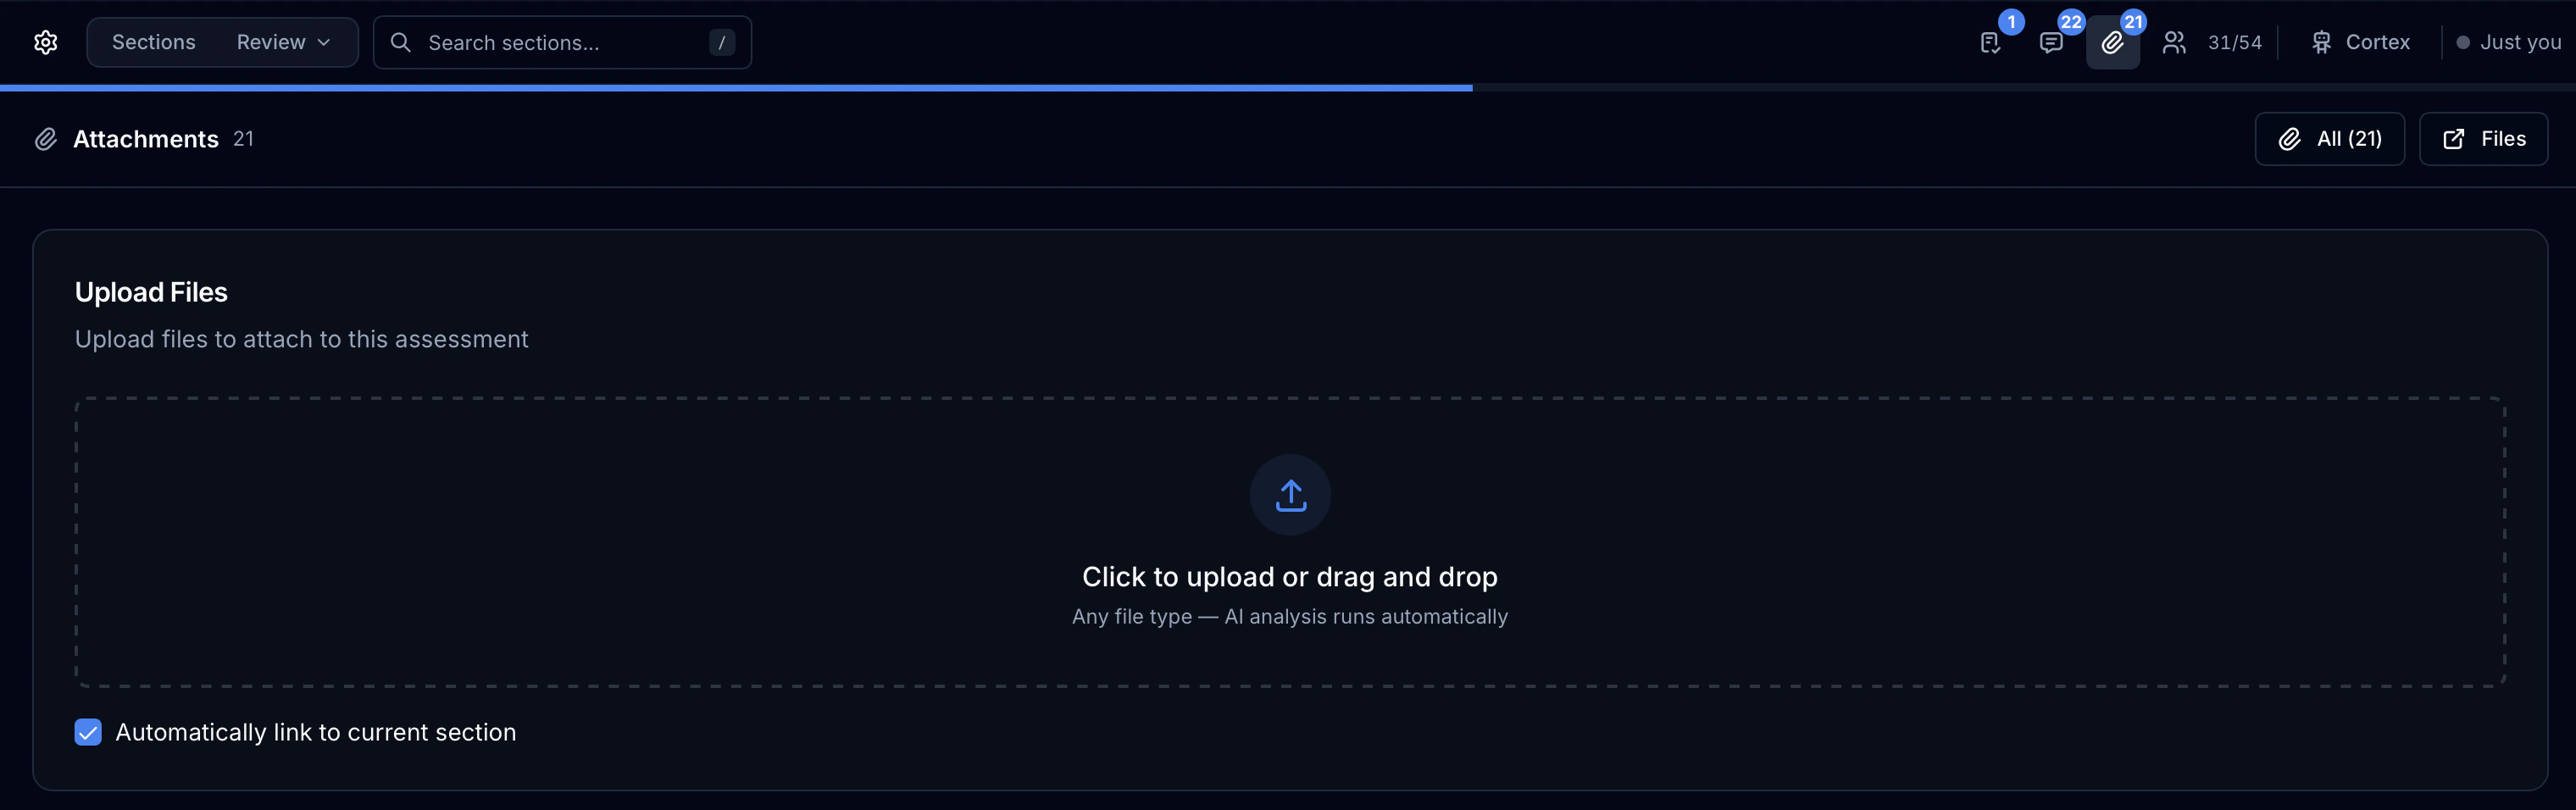
Evidence files are uploaded through the Attachments Panel on the right side of the Assessment Workbench.Open the Attachments Panel
In the Assessment Workbench, expand the Attachments panel on the right side. The upload area appears at the top of the panel.
Upload a File
You have two options:
- Drag and drop a file directly onto the upload area
- Click the upload area to open a file browser
Link to Current Section (Optional)
If you are viewing a specific requirement (e.g., 1.2.3), check the Link to Current Section checkbox before uploading. This automatically tags the file to the active sub-requirement, making it visible when that requirement is selected.
Automatic Processing
After upload completes, the file passes through the security pipeline automatically:
- SHA-256 hash computed for integrity verification
- Malware scan — ClamAV antivirus and VirusTotal hash lookup run in parallel
- Metadata extraction — page count, word count, headers, and preview text extracted
- Cortex AI analysis — automatic content analysis, requirement matching, and doctag suggestions
Accepted File Types
| Category | Formats |
|---|---|
| Documents | PDF, DOCX, DOC, XLSX, XLS, PPTX, PPT, VSDX |
| Images | PNG, JPG, JPEG, GIF, BMP, TIFF, SVG, WebP |
| Text & Config | TXT, CSV, JSON, XML, YAML, LOG, MD, HTML, SQL, CONF, INI |
| Certificates | PEM, CRT, CER, KEY, PUB, CSR, P12, PFX |
| Archives | ZIP |
| Logs | EVTX (Windows Event Logs) |
The Attachments Table
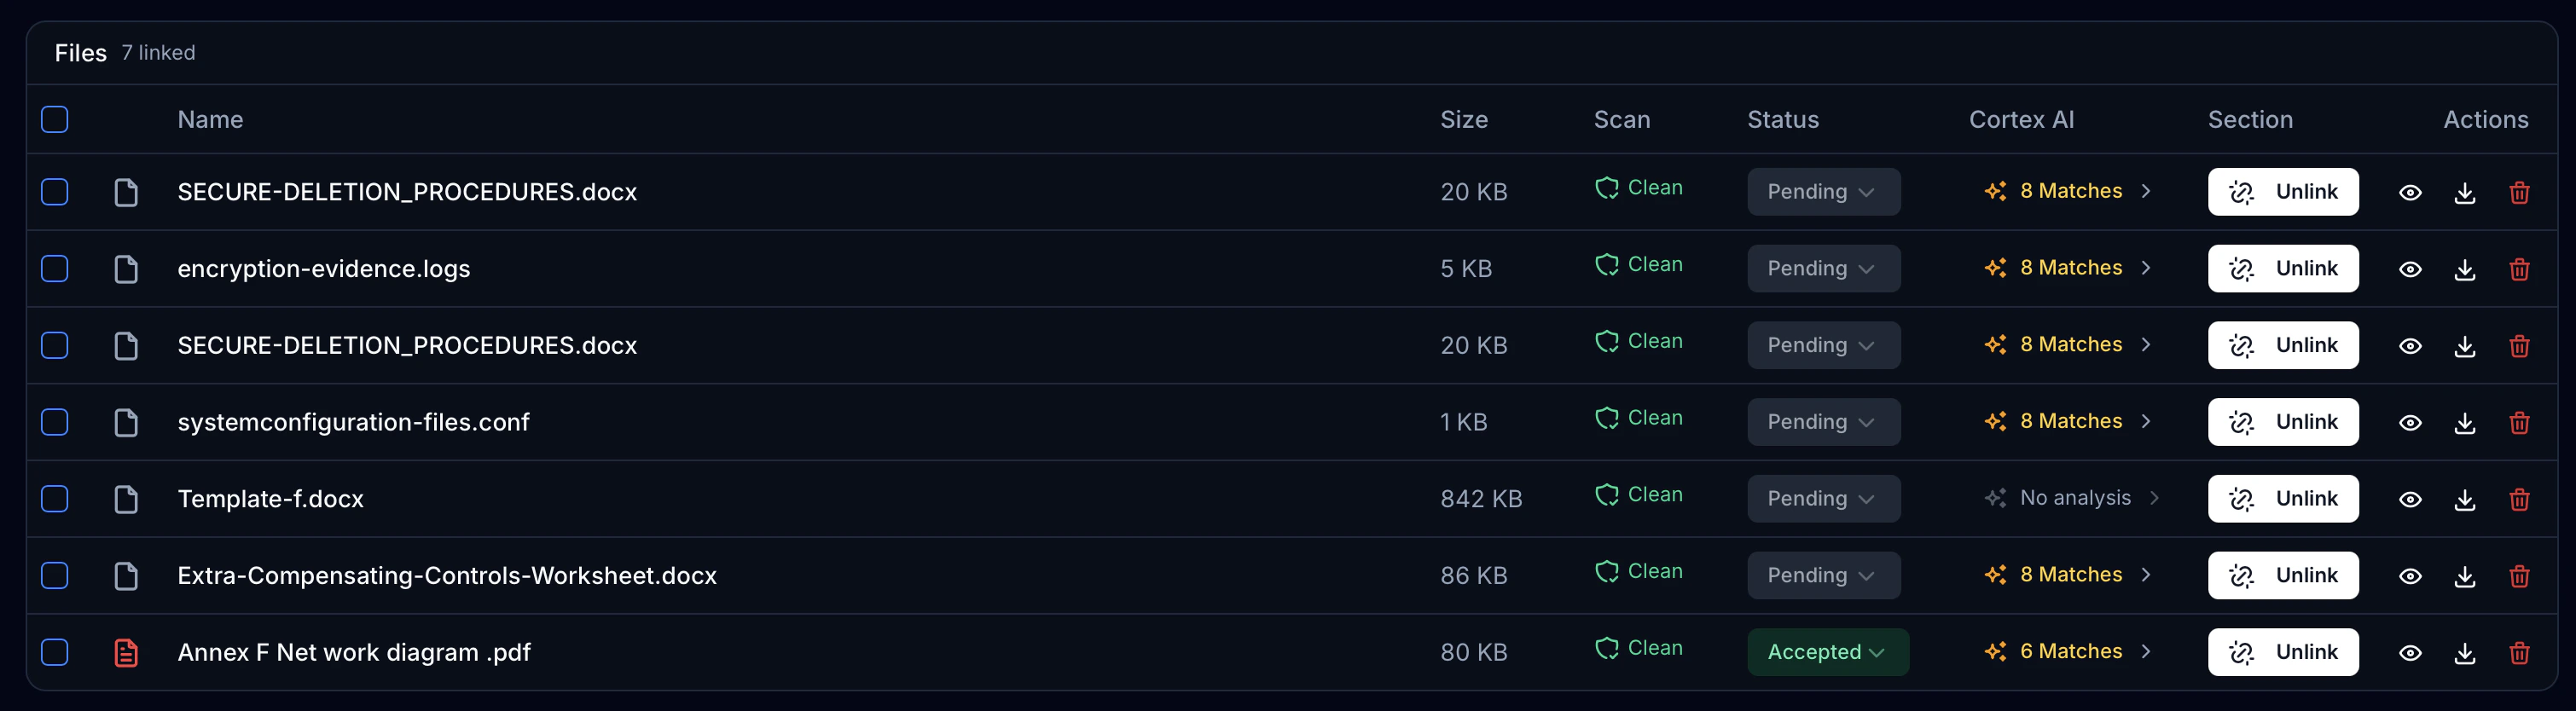
Each uploaded file appears as a row in the attachments table with the following columns:| Column | What It Shows |
|---|---|
| File Name | Name and file type icon (color-coded: red for PDF, yellow for ZIP, blue for images) |
| Size | Formatted file size (KB / MB / GB) |
| Scan Status | Malware scan result badge — see below |
| Status | Evidence validation status dropdown — see below |
| Cortex AI | AI analysis result with match count — see below |
| Actions | Download, Delete |
Malware Scan Status
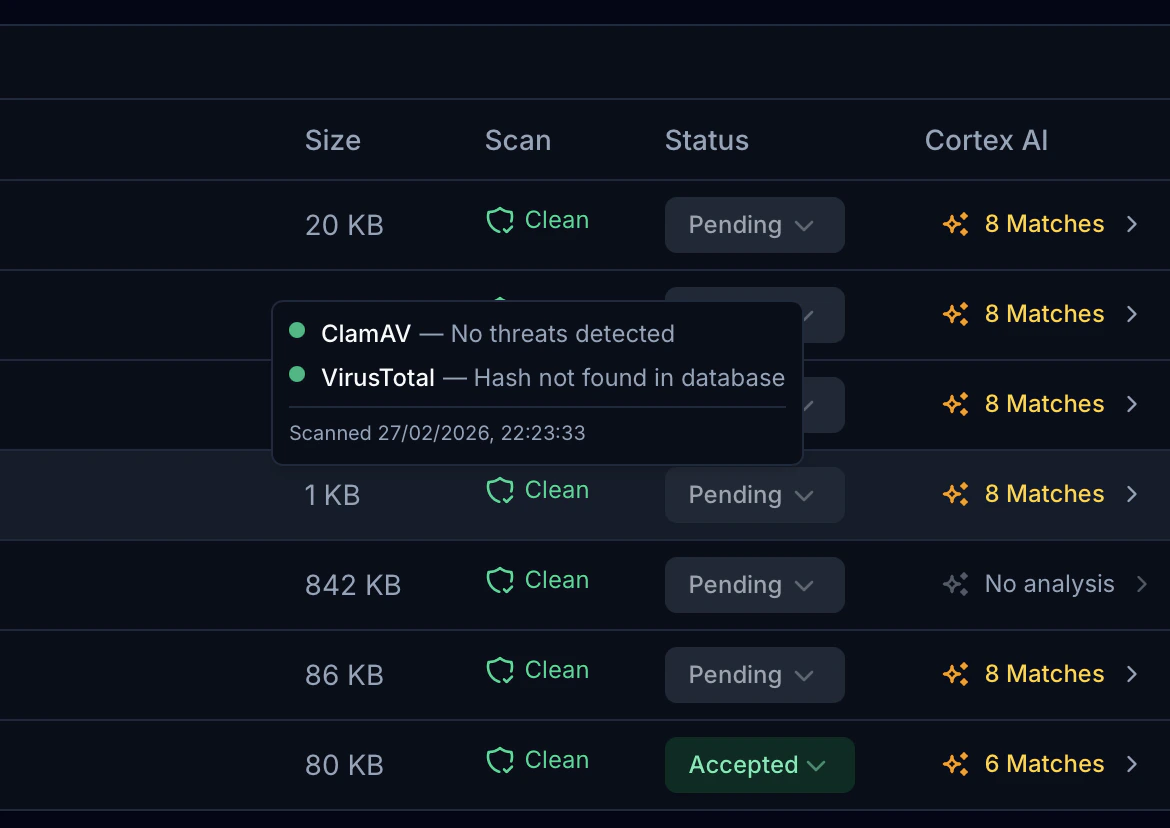
Every file displays a scan status badge immediately after processing:| Badge | Meaning |
|---|---|
| Clean (green checkmark) | File passed all scan engines with no detections |
| Threat (red warning) | File was flagged by one or more scan engines — quarantined and rejected |
| Scanning (spinner) | Scan is currently in progress |
| Pending (clock) | Scan has not started yet |
- ClamAV — local antivirus scan result
- VirusTotal — hash lookup result across 70+ antivirus engines with detection count
- Scanned at — timestamp of the last scan
Evidence Validation Status
Each file has a validation status dropdown that tracks the assessor’s review progress:| Status | Category | Meaning |
|---|---|---|
| Pending | — | File uploaded, not yet reviewed |
| QSA Review | Open | Provided by client, awaiting QSA review |
| Not Provided | Open | Expected evidence not yet received |
| Improvements | Open | Evidence received but needs revisions |
| To Discuss | Open | Requires discussion with client |
| Observe | Open | Flagged for observation in formal assessment |
| N/A | Closed | Not applicable to this requirement |
| Recommendation | Closed | Accepted with recommendations noted |
| Accepted | Closed | Evidence fully accepted |
Document Tags (Doctags)
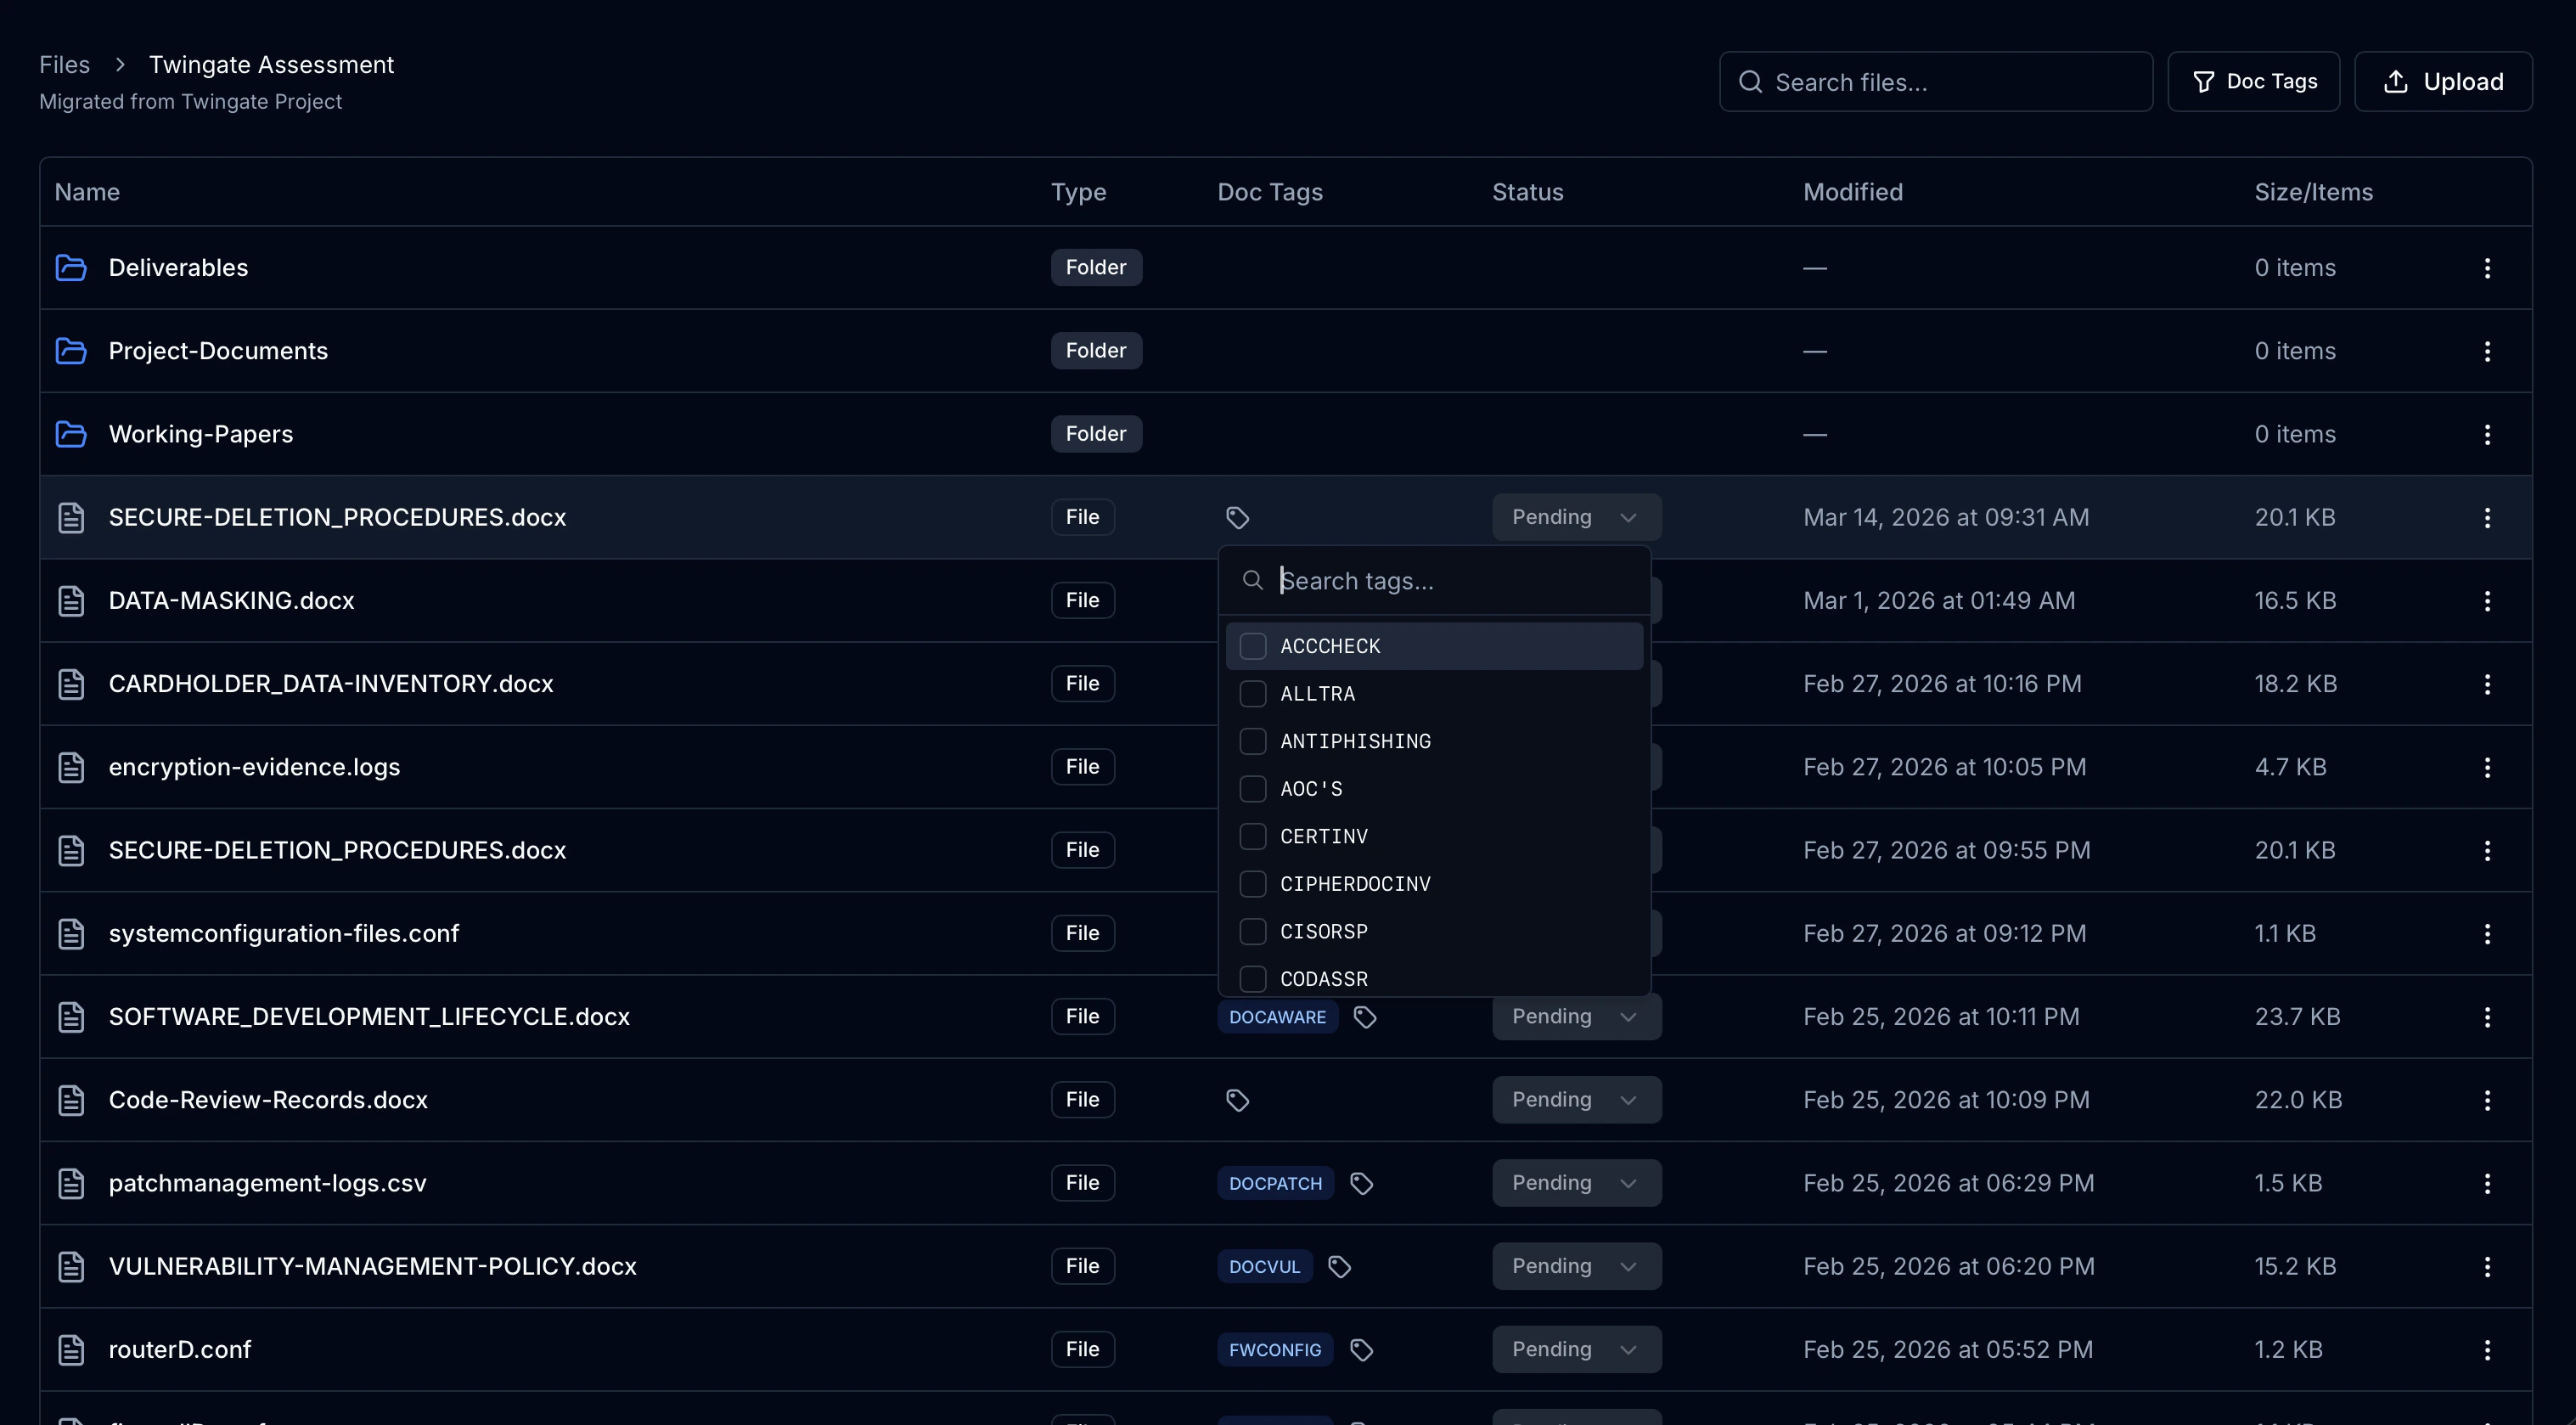
Doctags are standardized reference codes that categorize evidence files by their purpose in the PCI DSS assessment. They map files to specific documentation requirements in the ROC template (e.g.,DOCFW for firewall documentation, PENTEST for penetration test reports).
How Doctags Are Assigned
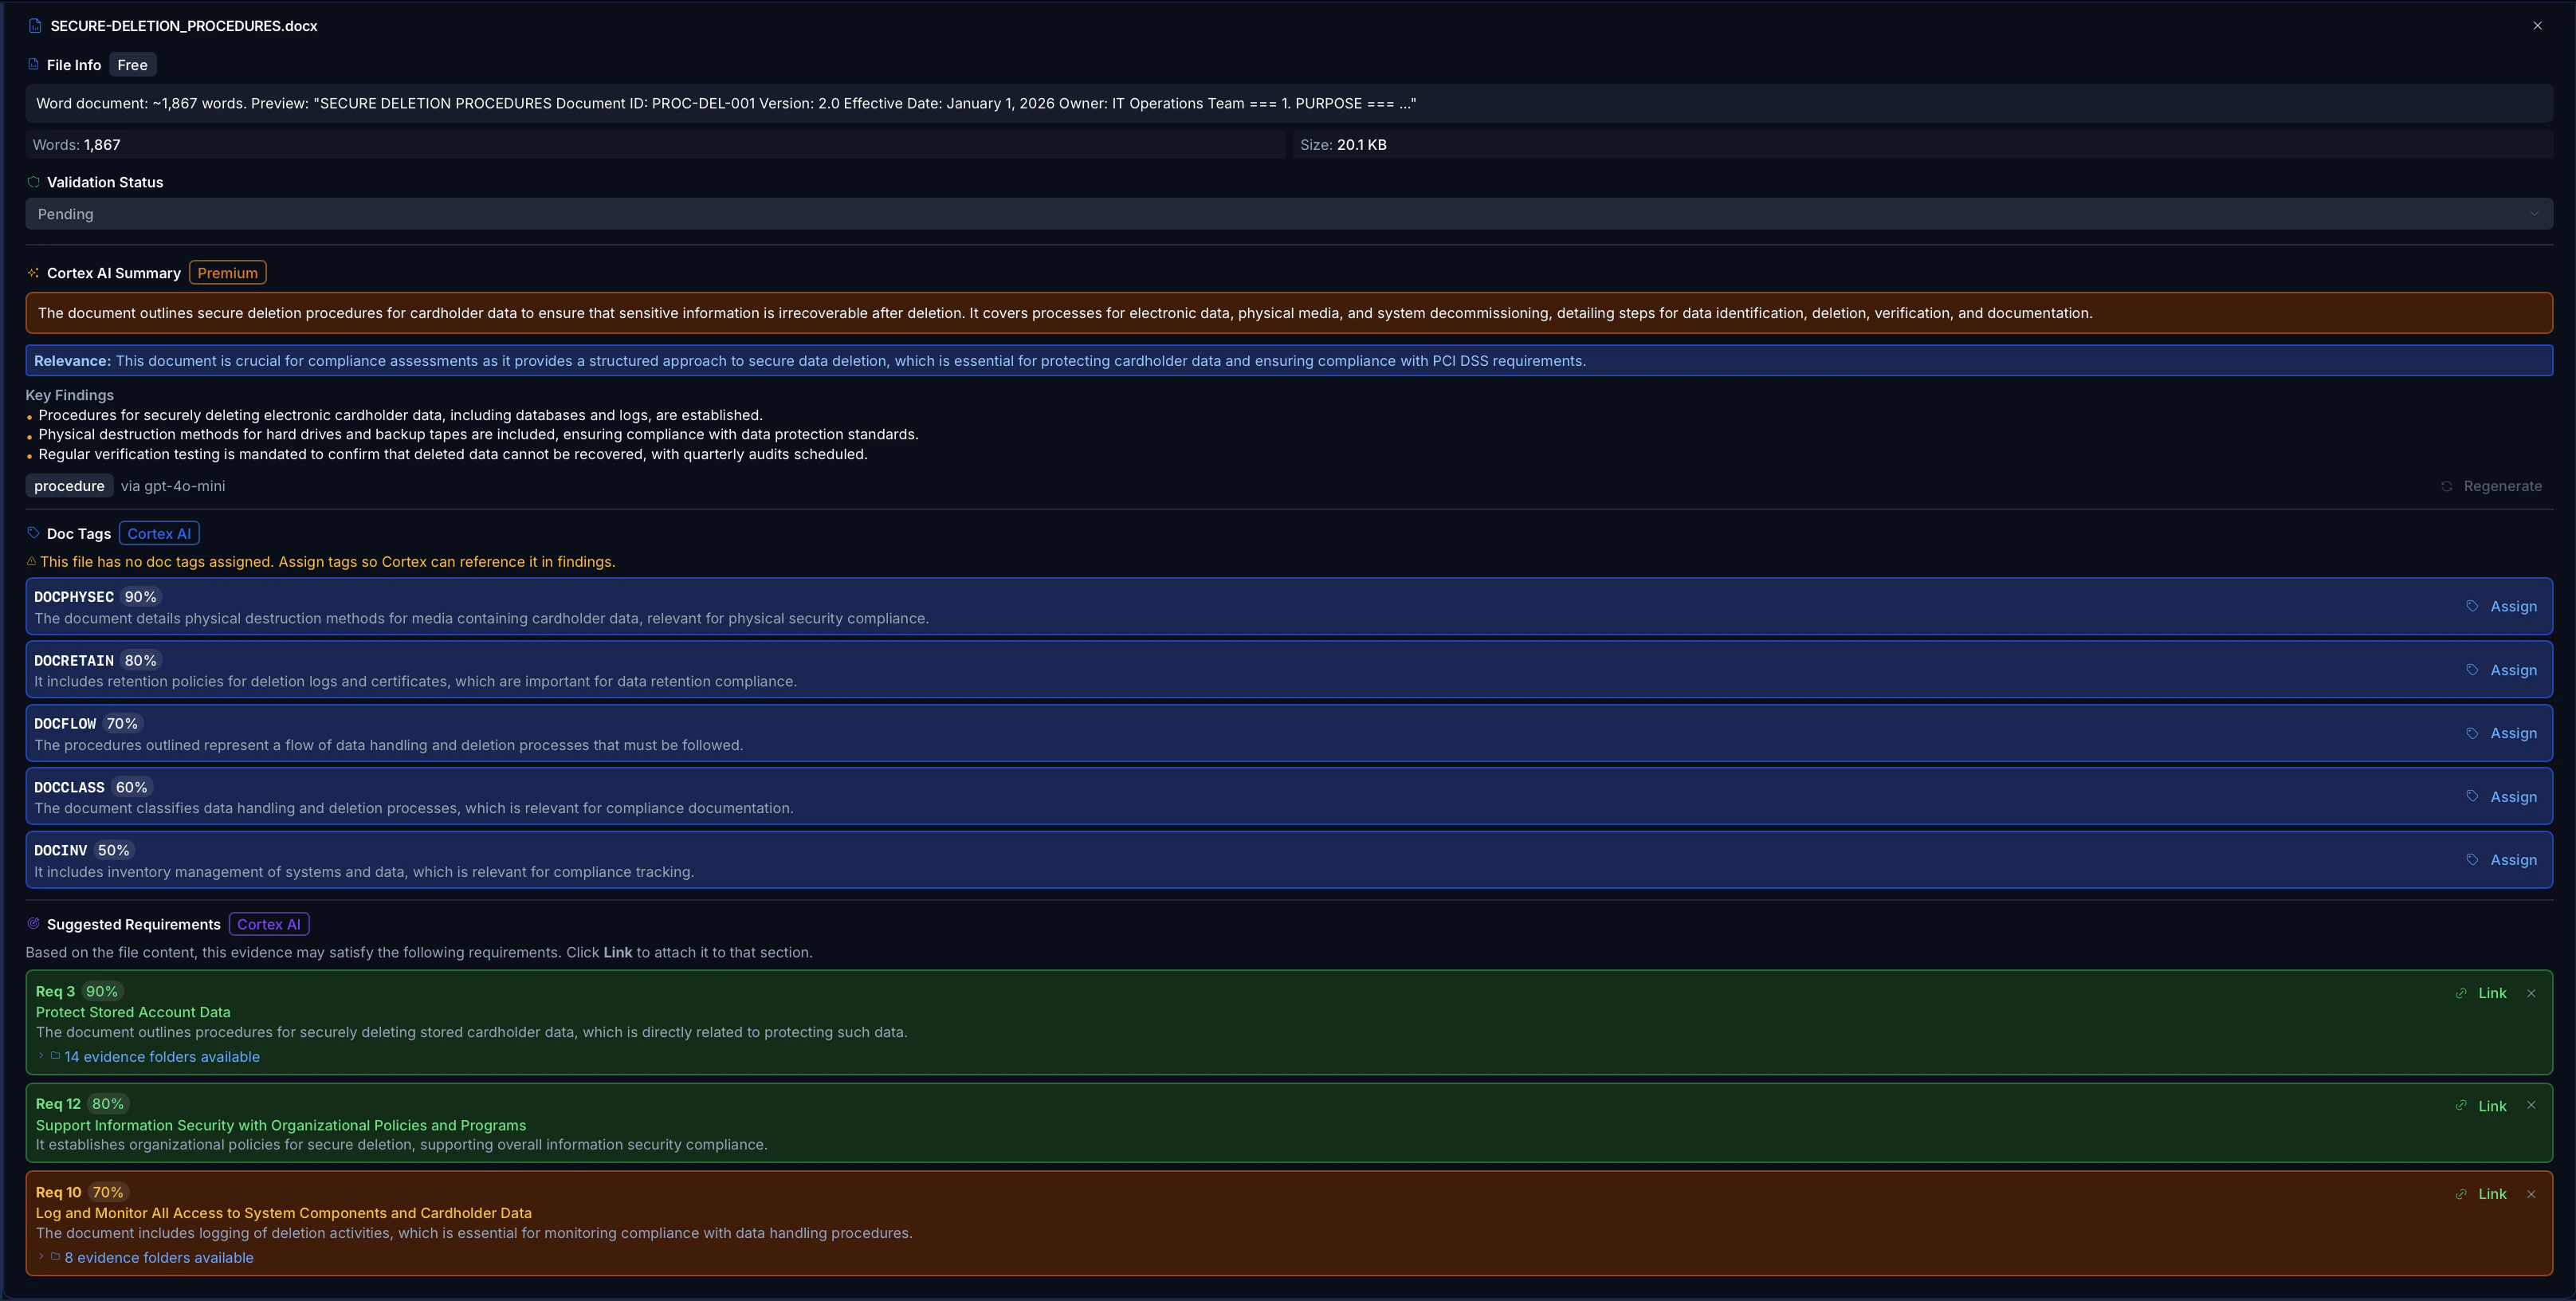
Doctags can be assigned in two ways: AI-Suggested Tags: After Cortex AI analyzes a file, it suggests relevant doctags with confidence scores. In the file’s expanded detail row:- Suggested tags appear as outline badges with a confidence percentage (e.g.,
DOCFW 92%) - Click the + button on a suggested tag to assign it
- Assigned tags appear as solid blue badges with an x to remove
Common Doctags
| Tag | Description | Related Requirements |
|---|---|---|
DOCFW | Firewall documentation | 1.2.2, 1.2.5, 1.2.6, 1.2.7, 1.5.1 |
DOCHARD | Hardware documentation | 1.2.1, 1.4.5, 2.1.1 |
DOCCRYPTO | Cryptography documentation | 3.6.1.1 |
DOCPWD | Password policy documentation | 8.2.2, 8.2.3, 8.2.4, 8.3.10 |
DOCPOI | Point-of-sale documentation | 9.5.1 |
PENTEST | Penetration test reports | 11.4.2, 11.4.3, 11.4.4, 11.4.5 |
CERTINV | Certificate inventory | 4.2.1.1 |
Automatic Section 6.4 Sync
When a doctag is assigned to a file, the platform automatically updates the Section 6.4 Documentation Evidence table in your assessment. Each tagged file creates or updates a row with:- Reference — the assigned doctag(s) (e.g.,
DOCFW, DOCHARD) - Document Name — the file name
- Purpose — AI-generated description of the file’s content
- Revision Date — the upload date
Cortex AI Analysis
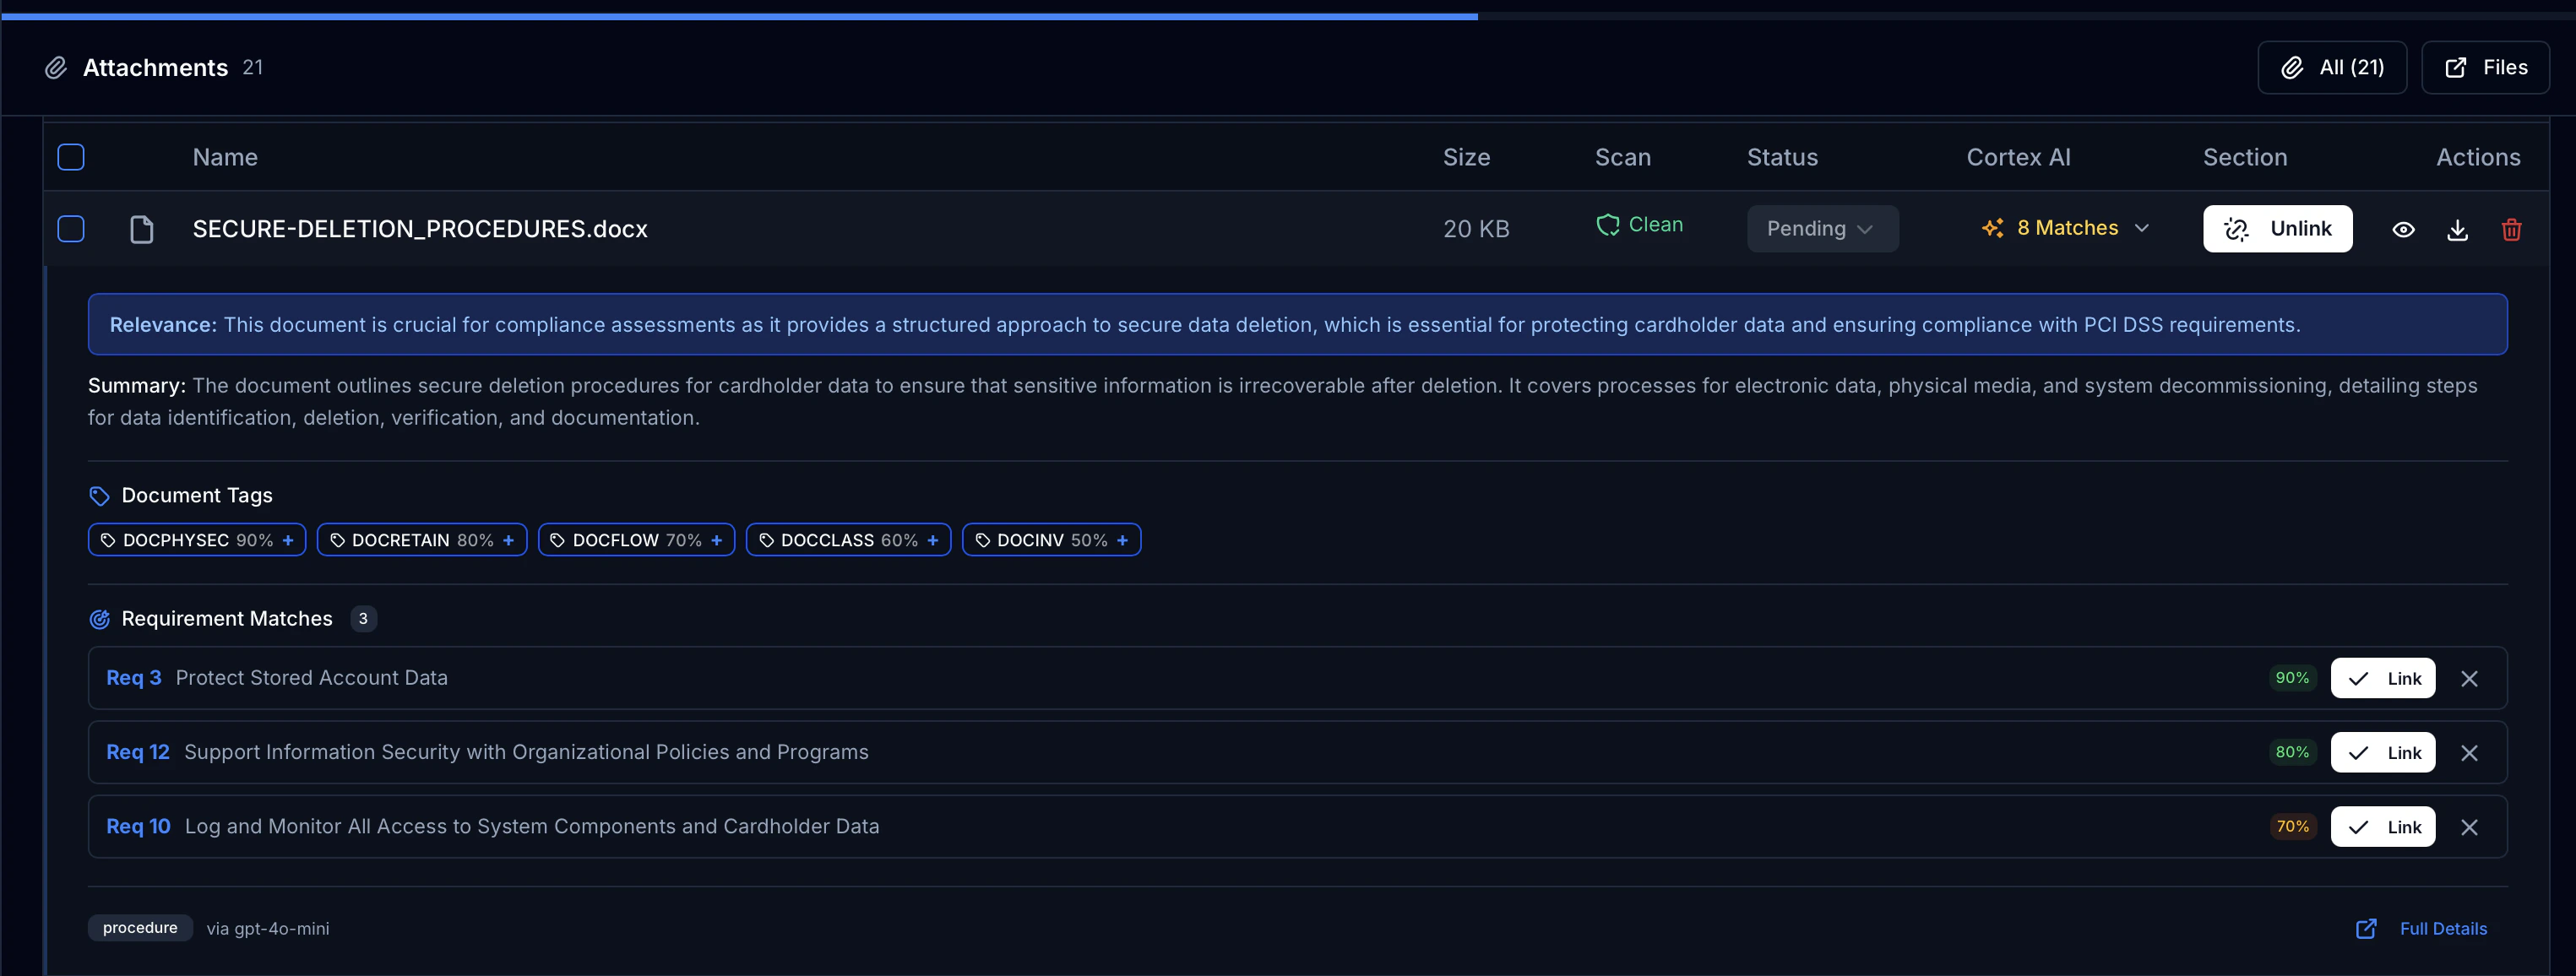
After upload, Cortex AI automatically analyzes each file and provides:Requirement Matching
Cortex identifies which PCI DSS requirements the file is relevant to. In the expanded file detail row:- Each suggested requirement shows the requirement number, title, and a confidence score
- Confidence is color-coded: green (80%+), amber (50–79%), gray (below 50%)
- Click Link to associate the file with a requirement, or Unlink to remove the association
Criteria Validation
If a validation specification exists for the linked requirement, Cortex checks the file against the specific content criteria that the ROC template requires:| Indicator | Meaning |
|---|---|
| Complete (green) | All criteria found in the document |
| Partial (amber) | 50% or more criteria found, some gaps |
| Insufficient (red) | Less than 50% of criteria found |
- Checkmark — criterion found, with a brief excerpt from the document
- X mark — criterion not found, with a note explaining what is missing
AI Summary
Each analyzed file receives:- Relevance — why this file matters for compliance
- Summary — AI-generated description of the file’s contents
- Document Type — classification badge (e.g., PDF, spreadsheet, configuration)
- Model — which AI model performed the analysis
File Integrity Verification
Every file is SHA-256 hashed at the moment of upload. At any time after upload, you can verify that the file has not been altered in storage.Review the Result
The platform re-downloads the file from storage, recomputes the SHA-256 hash, and compares it against the stored original:
The verification timestamp is recorded in the file’s metadata for audit purposes.
| Result | Meaning |
|---|---|
| Verified | Current hash matches stored hash — file is intact |
| Tampered | Hashes do not match — file has been altered in storage |
Integrity verification is non-destructive and read-only. It does not modify the file or its metadata beyond recording the verification result and timestamp.
File Metadata Preview
Kliper automatically extracts metadata from uploaded files, giving assessors immediate context without downloading:| File Type | Extracted Preview |
|---|---|
| Page count, word count, text preview (first 500 characters) | |
| Word (DOCX/DOC) | Word count, text preview |
| Excel (XLSX/XLS) | Sheet names, row/column counts, header names |
| PowerPoint (PPTX) | Slide count, text preview from first slide |
| Visio (VSDX) | Page count, text labels from diagram elements |
| CSV | Column headers, row count, first 3 rows as preview |
| Images | Format, file size |
| Text/Config | Line count, word count, text preview |
| Certificates (PEM) | Certificate type (certificate, private key, public key, CSR) |

View Modes and Filtering
The Attachments Panel supports multiple view modes:| Mode | Behavior |
|---|---|
| Section View | Shows only files linked to the currently selected requirement (e.g., files tagged to 1.2.3) |
| All Files | Shows every file uploaded to the assessment, regardless of section |
| Requirement Folder Browser | Browse files organized by requirement number in a hierarchical folder structure |
Bulk Operations
Select multiple files using the checkboxes to perform bulk actions:- Download Selected — downloads all selected files
- Delete Selected — removes all selected files from the assessment
Evidence Requests by Assessment
When working across multiple assessments, the Evidence Requests panel groups requests into collapsible sections — one per assessment. This lets you focus on one engagement at a time without losing sight of the others. Each section header displays:- Assessment name
- Total request count — all requests in that assessment
- Accepted badge — number of requests in accepted status
- Open badge — number of requests still pending or in progress
Evidence Request Templates
Kliper includes 56 pre-built PCI DSS evidence request templates covering all 12 principal requirements. Templates let assessors create evidence requests in seconds instead of filling forms from scratch.Using Templates
Open the New Request Dialog
Click New Request in the Evidence Requests panel. A chooser dialog appears with two options: Custom Request (blank form) or From Template (pre-built templates).
Browse and Select Templates
Templates are grouped by PCI DSS requirement (Req 1–12). Use the search bar to filter by title, requirement number, or description. Select individual templates or use the category checkbox to select all templates in a group.
Template Coverage
| Category | Examples |
|---|---|
| Req 1 — Network Security | Firewall configs, network diagrams, data flow diagrams |
| Req 2 — Secure Configuration | Hardening standards, default credential removal |
| Req 3 — Account Data Protection | Encryption policies, key management procedures |
| Req 4 — Transmission Encryption | TLS certificates, secure transmission policies |
| Req 5 — Malware Protection | Anti-malware deployment, scan reports |
| Req 6 — Secure Development | SDLC documentation, change management, code reviews |
| Req 7 — Access Restriction | Access control policies, role matrices |
| Req 8 — User Identification | Password policies, MFA configuration, account reviews |
| Req 9 — Physical Security | Facility access logs, visitor logs, media handling |
| Req 10 — Logging & Monitoring | Audit log configurations, time sync, log review procedures |
| Req 11 — Security Testing | Vulnerability scans, penetration test reports, IDS/IPS configs |
| Req 12 — Organizational Policies | Information security policy, incident response plan, risk assessments |